Completion Progress - plugin
Completion Progress Plugin
Part 1: Install the Completion Progress Plugin
Description: The Completion Progress block is a visual tool that allows both teachers and students to track progress in a Moodle course. It shows the completion status of activities and provides a color-coded visual bar to indicate progress, upcoming tasks, and overdue activities.
Part 1: Add Completion Progress Block to a Course
Now that the plugin is installed, you can add it to any course to start tracking student progress.
Step-by-Step Guide to Adding the Block
- Go to the Course:
-
Enter the course where you want to use the Completion Progress block.
-
Enable Editing:
-
Click Turn editing on (usually located at the top-right corner of the course page).
-
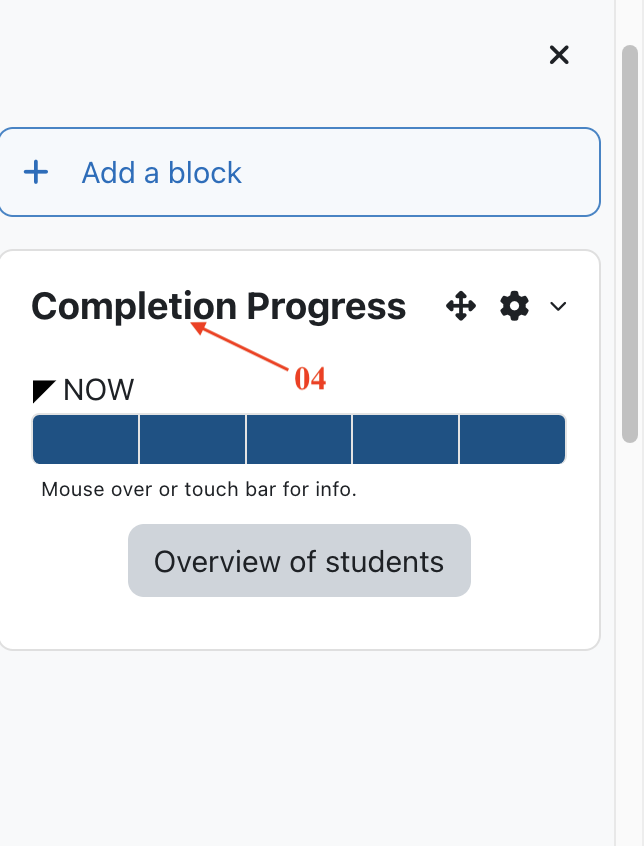
Add the Completion Progress Block:
- Scroll down to the Add a block option (often found in the side panel or at the bottom of the course page).
-
Click Add a block and select Completion Progress from the list of available blocks.

-
Position the Block:
-
Once added, the Completion Progress block will appear on the right side of your course page. You can reposition it by dragging or configuring it to display in a particular location.
Part 2: Enable Activity Completion for Course Activities
To make use of the Completion Progress block, you need to enable Activity Completion for each activity or resource you want to track.
Example Steps for Enabling Activity Completion
- Go to an Activity:
-
Select any activity you want to track, such as an Assignment, Quiz, or Forum.
-
Edit the Activity Settings:
-
Click Edit next to the activity, then select Edit settings.
-
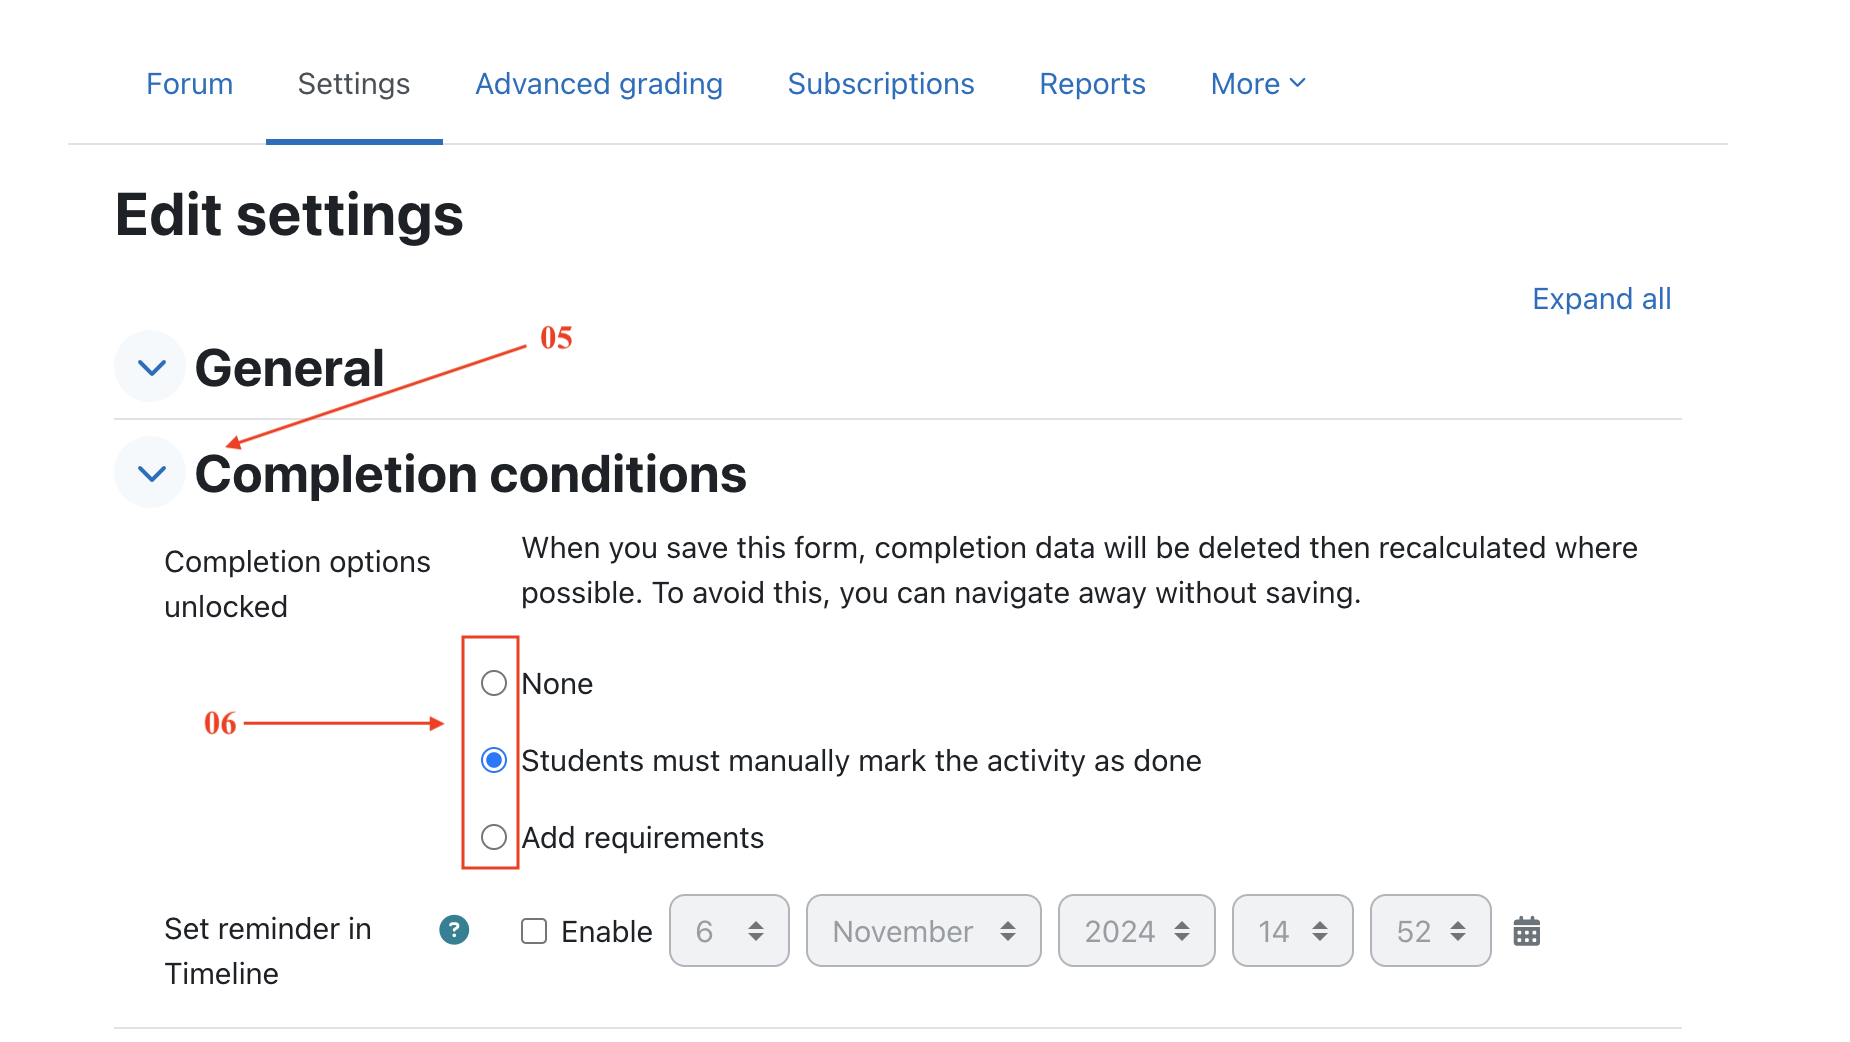
Enable Activity Completion:
- Scroll down to the Completion conditions section.
-
In the Completion conditions dropdown, select one of the following options:
- None: The activity won’t be tracked.
- Students must manually mark the activity as done: Allows students to mark it as done themselves.
- Activity is completed when students do all the following:: Set specific criteria, such as View the activity, Start discussions or post replies, or Receive a grade the activity.
-
Save Changes:
-
After setting the completion criteria, click Save and return to course.
-
Repeat this for each activity you want to include in the Completion Progress block.
Part 3: Configure the Completion Progress Block
Once the activities have Activity Completion enabled, configure the Completion Progress block to display the desired activities.
Step-by-Step Guide for Configuring the Block
- Open Block Settings:
-
In the Completion Progress block, click the gear icon (⚙️) to access Block Settings.
-
Customize the Block:
-
Choose how you want activities displayed:
- Order of activities: Display activities based on order in the course or by expected completion date.
- Highlight upcoming activities: Enable this to emphasize activities with due dates, helping students stay on track.
- Progress bar colors: Configure colors to indicate the status of each activity:
- Green: Completed.
- Red: Overdue.
- Yellow: In progress.
- Blue: Upcoming.
-
Save Settings:
- After setting up the display options, click Save changes.
Part 4: Example Scenario of Completion Progress in Action
Let’s say you want to track progress for Assignment 1, Quiz 1, and a Discussion Forum. Here’s how it would look in action:
- For Assignment 1:
-
Set Activity completion to "Show activity as complete when conditions are met" and choose Require grade.
-
For Quiz 1:
-
Set Activity completion to "Show activity as complete when conditions are met" and require a passing grade.
-
For the Discussion Forum:
-
Set Activity completion to "Show activity as complete when conditions are met" and require a certain number of posts.
-
Monitor Progress:
- The Completion Progress block now shows these three activities with a color-coded bar, indicating each student’s progress. For example:
- Green for completed items.
- Red for overdue items.
- Yellow for activities that are in progress or pending completion.
- Blue for upcoming tasks.
Part 5: How Students Mark Activities as Done
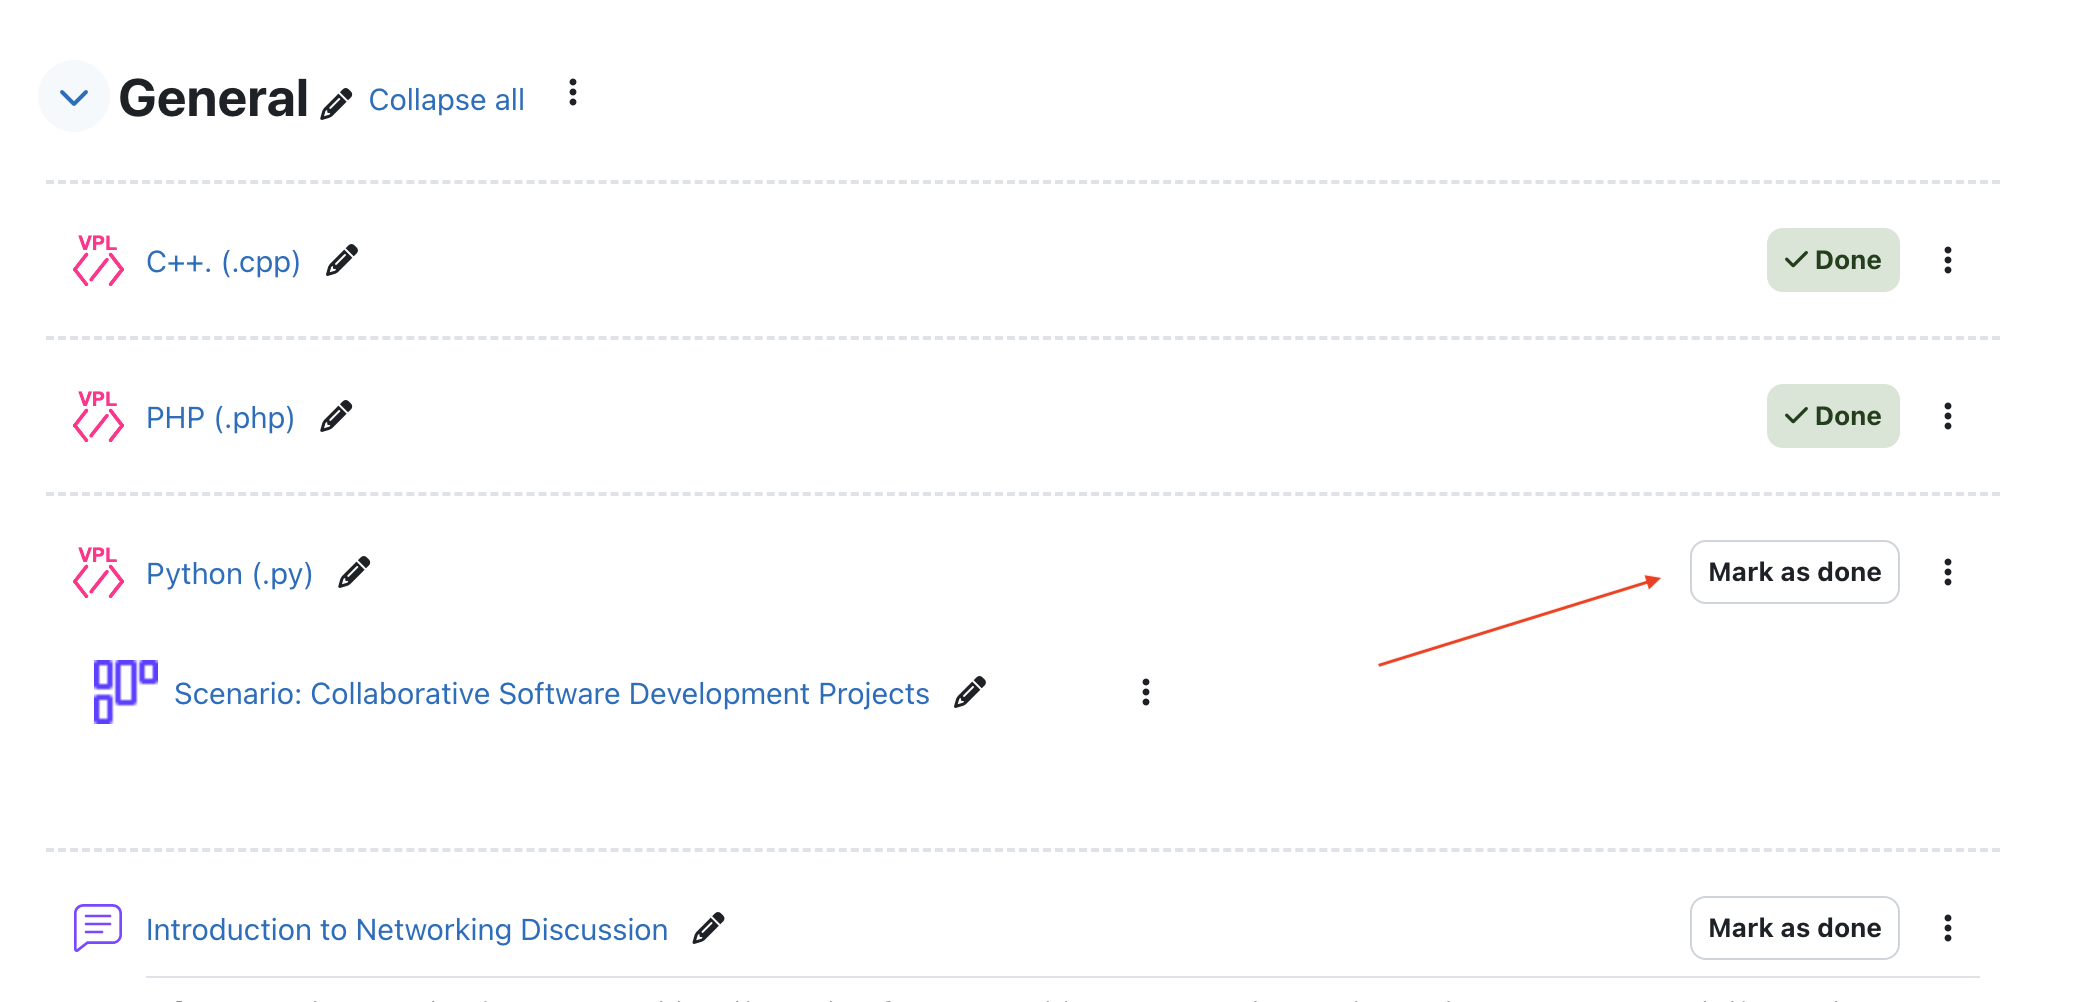
Once manual completion is enabled, students can mark the activity as done from their end:
- Go to the Activity: Students will see a checkbox next to each activity that has manual completion enabled.
- Mark as Done:
- To mark the activity as complete, students simply click the checkbox next to the activity name.
- Once checked, the activity will show as completed in their view, and it will appear as completed in the Completion Progress block.
Viewing and Using the Completion Progress Block
- For Students: Students will see a color-coded bar displaying their progress for each tracked activity, helping them manage deadlines and upcoming tasks.
-
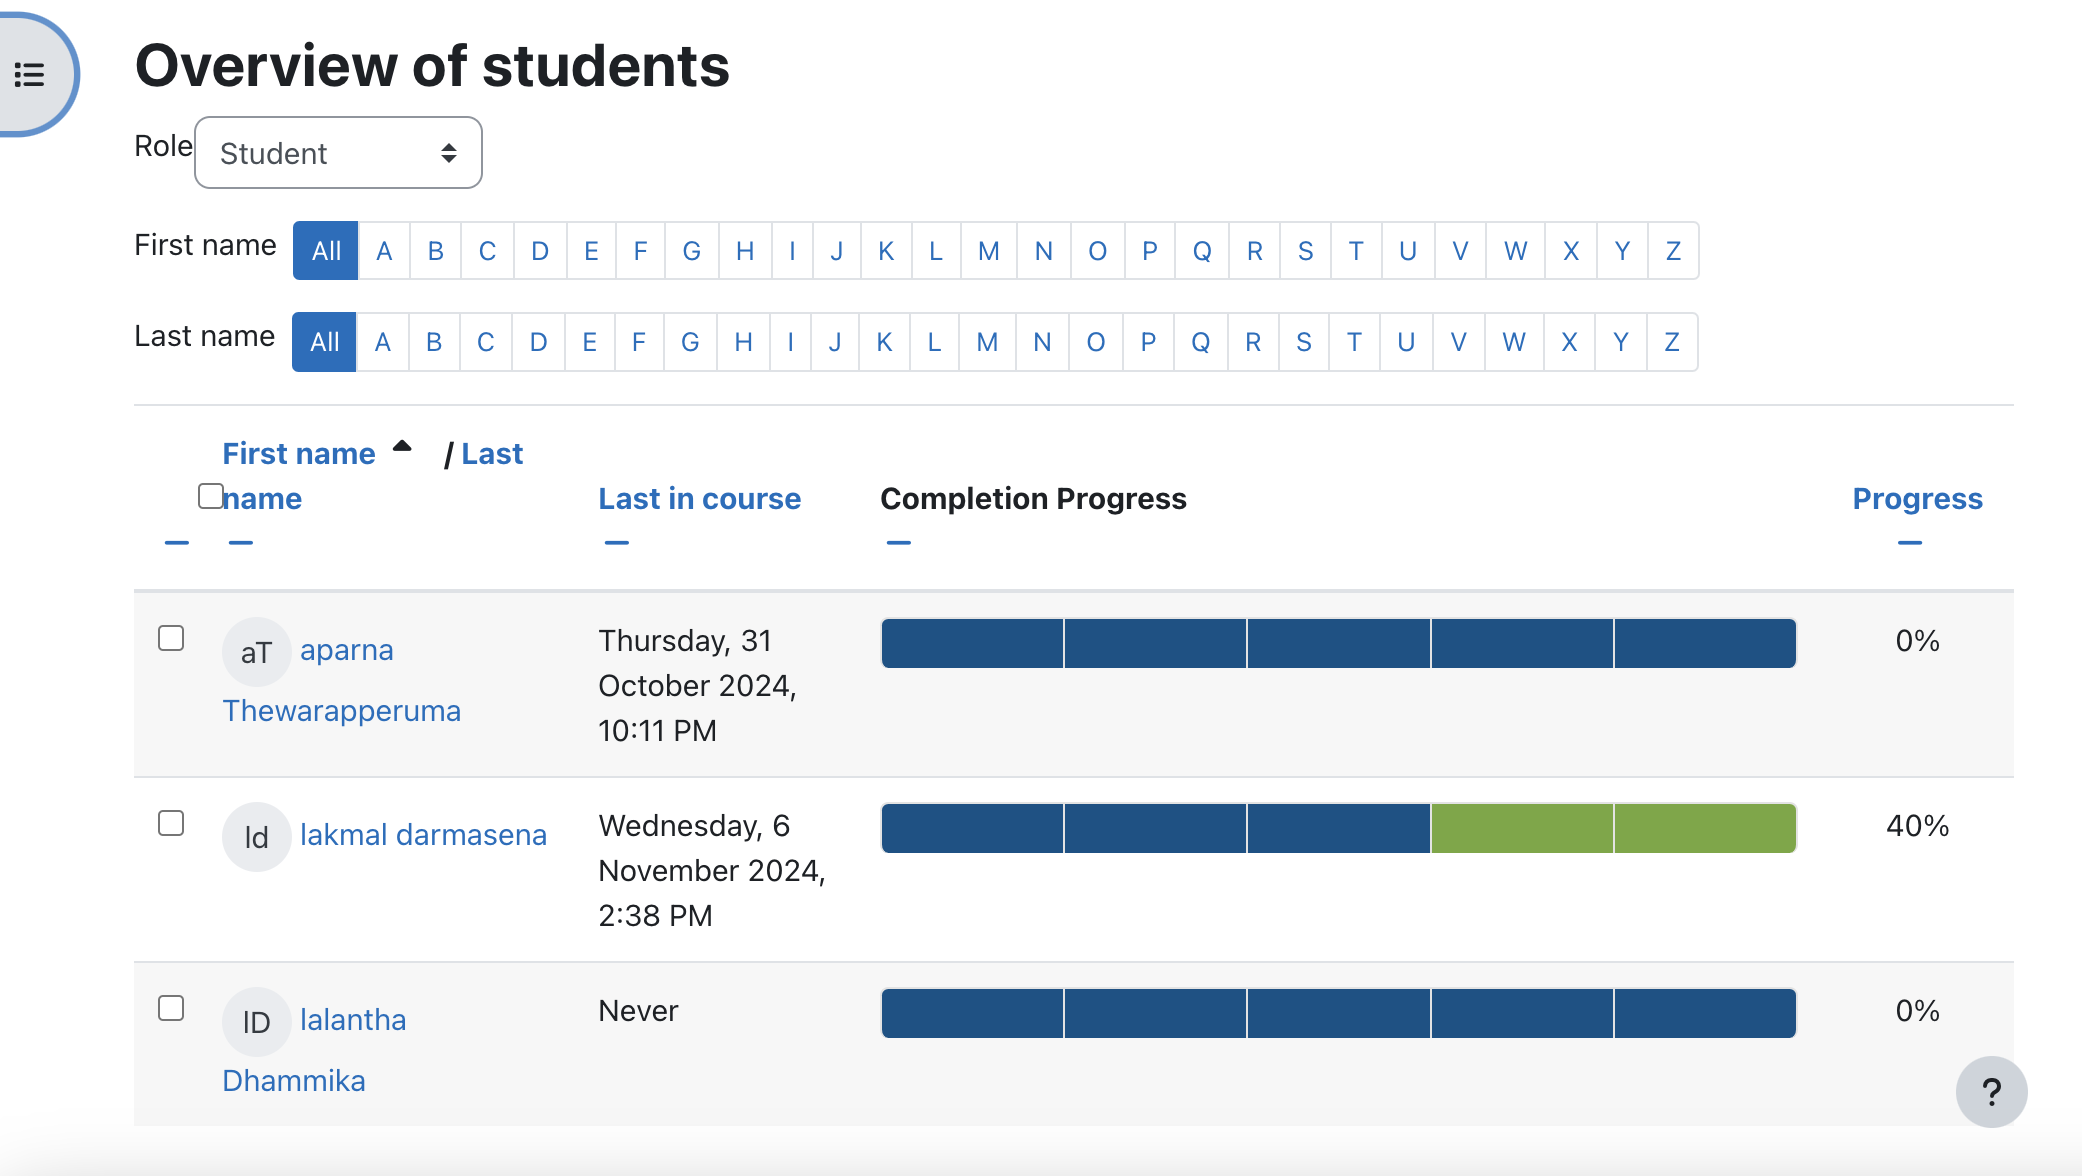
For Teachers: Teachers can click on the block to view an overview of each student’s progress, making it easier to identify students who may need reminders or additional support to complete the activities.

This comprehensive setup helps ensure both teachers and students can track, monitor, and stay up-to-date with course activities using the Completion Progress block in Moodle.