Build Your Own Website
Using WordPress, Build Your Own Website
WordPress is one of the most popular and user-friendly platforms for creating websites, whether for personal projects, businesses, or blogs. This guide will walk you through the step-by-step process of building your own website using WordPress. From planning your design to setting up pages and customizing your site, you'll learn how to create a professional and functional website with ease.
Getting Started with Website Design
Using WordPress, build your own website. This guide covers how to create a website. First, you should have an idea of the design you want to create. In this guide, I will walk you through building a website based on the attached wireframe.
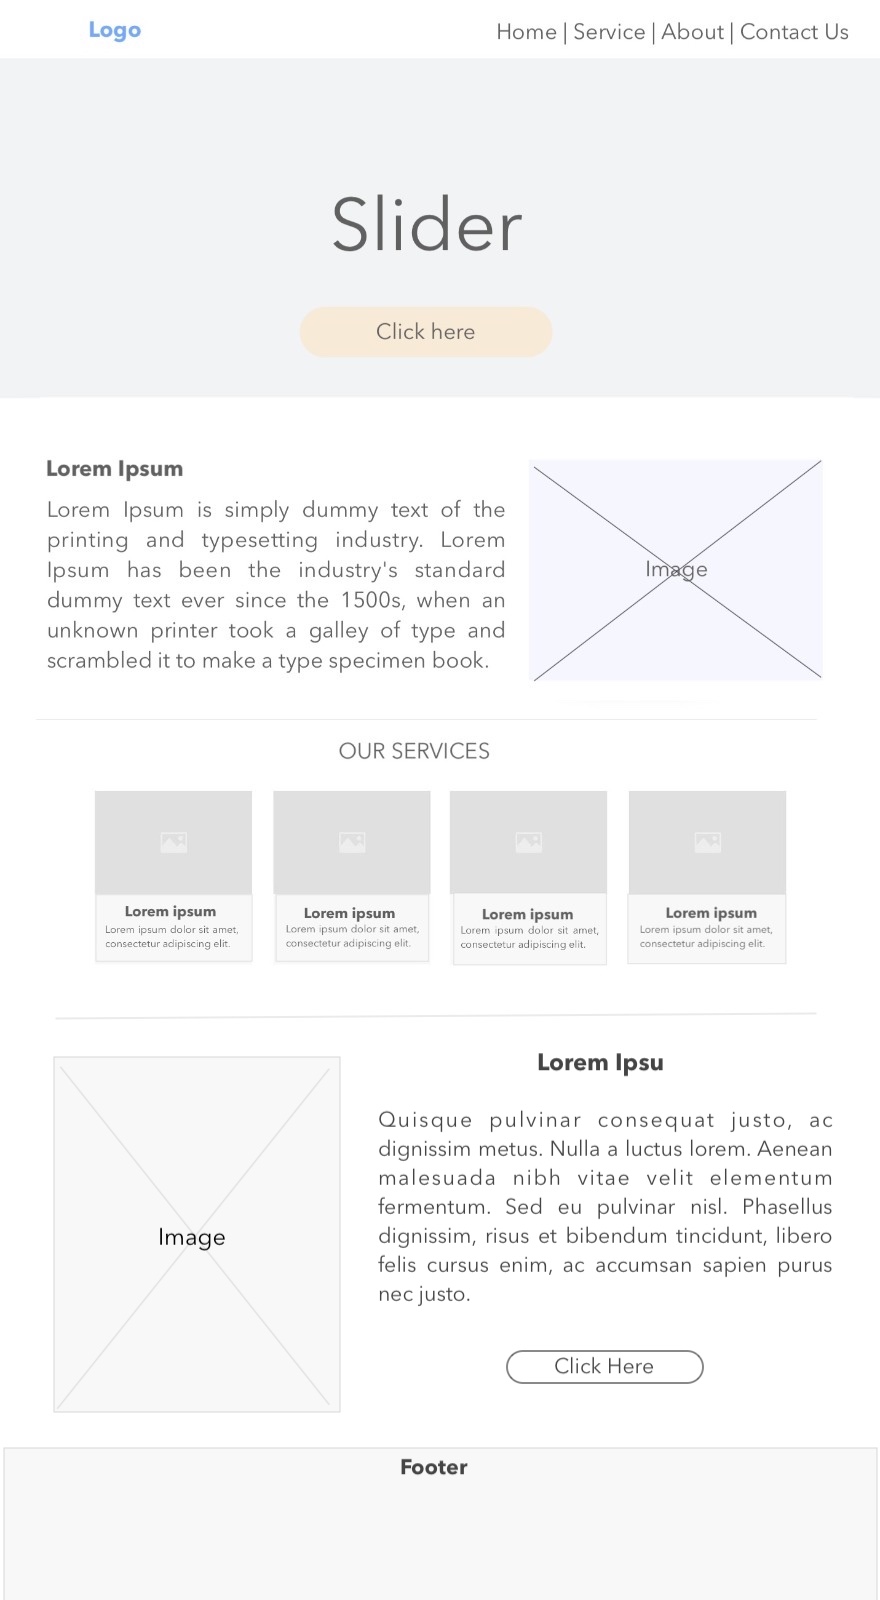
Here’s a step-by-step guide to creating your website using WordPress based on above wireframe:
Workshop Materials :- Download here
Step 1: Set Up WordPress
- Log in to the WordPress dashboard by going to yourdomain.com/wp-admin.
- eg: (http://wordpress:8000/wp-admin)
Step 2 : Choose & Install a Theme (installing is Optional)
- Go to Appearance → Themes → Add New.
- Search for a lightweight theme like Astra, GeneratePress, or OceanWP.
- Click Install, then Activate the theme.
Step 3: Install Essential Plugins
To install a plugin:
1. Go to Plugins → Add New.
2. Search for the plugin name.
3. Click Install Now, then Activate.
Here are the required plugins (already installed):
✅ Elementor – For page building.
✅ Smart Slider 3 – For the homepage slider.
✅ Contact Form 7 – For contact forms (Optional).
✅ Yoast SEO – For search engine optimization (Optional).
✅ WP Rocket or LiteSpeed Cache – For website speed optimization (Optional).
Step 4: Create the Homepage & Set It as the Default Page
-
Create a “Home” Page in WordPress
-
In your WordPress dashboard, go to: Pages → Add New

- If a setup pop-up window appears, close it.
- In the page title field, type: Home
-
Click the Publish button (top right corner).
-
Once the page is published, click the WordPress logo / Dashboard link (top-left corner) to go back to the main Dashboard.
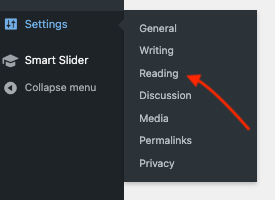
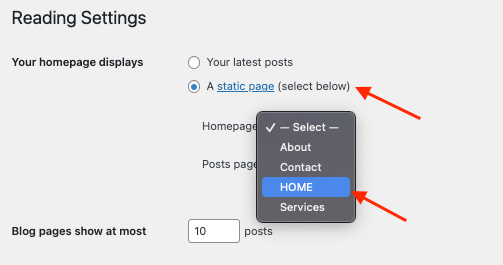
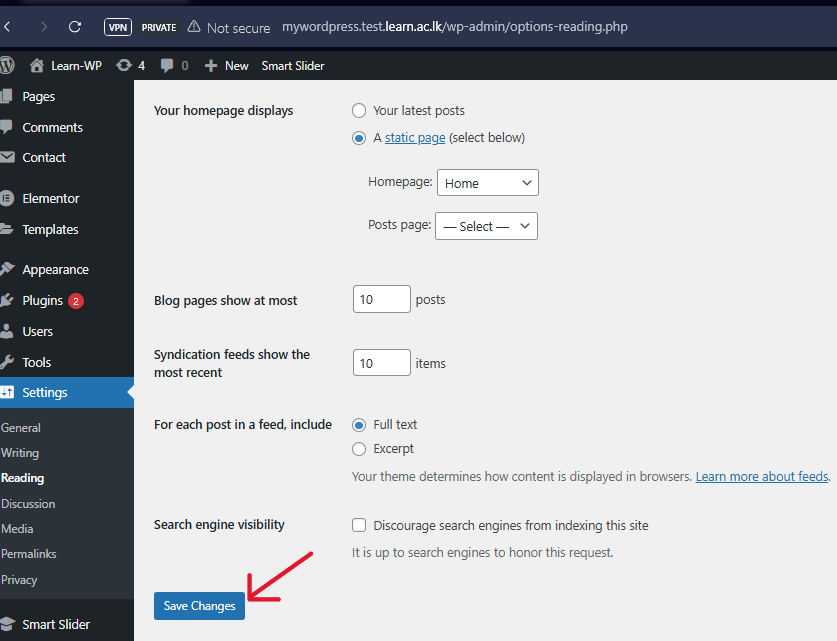
- Go to Settings → Reading, select "A static page", and choose "Home".
- Click Save
Step 5: Build Each Section of the Homepage
Now, we will create each section based on your wireframe.
1. Logo Section
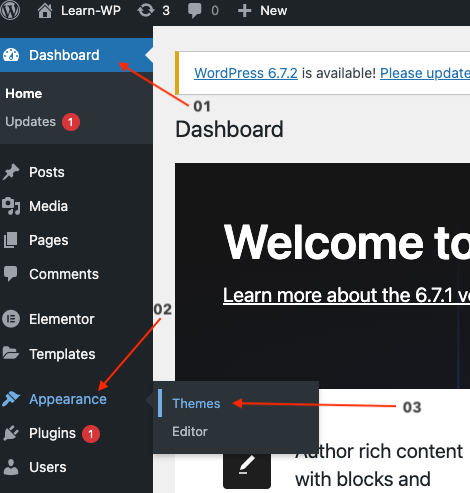
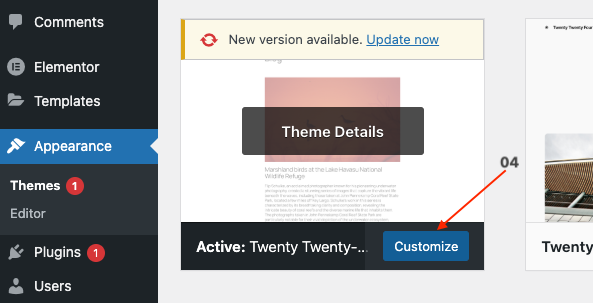
- Go to WordPress Dashboard [1] → Appearance [2] → Themes[3] → Customize[4].
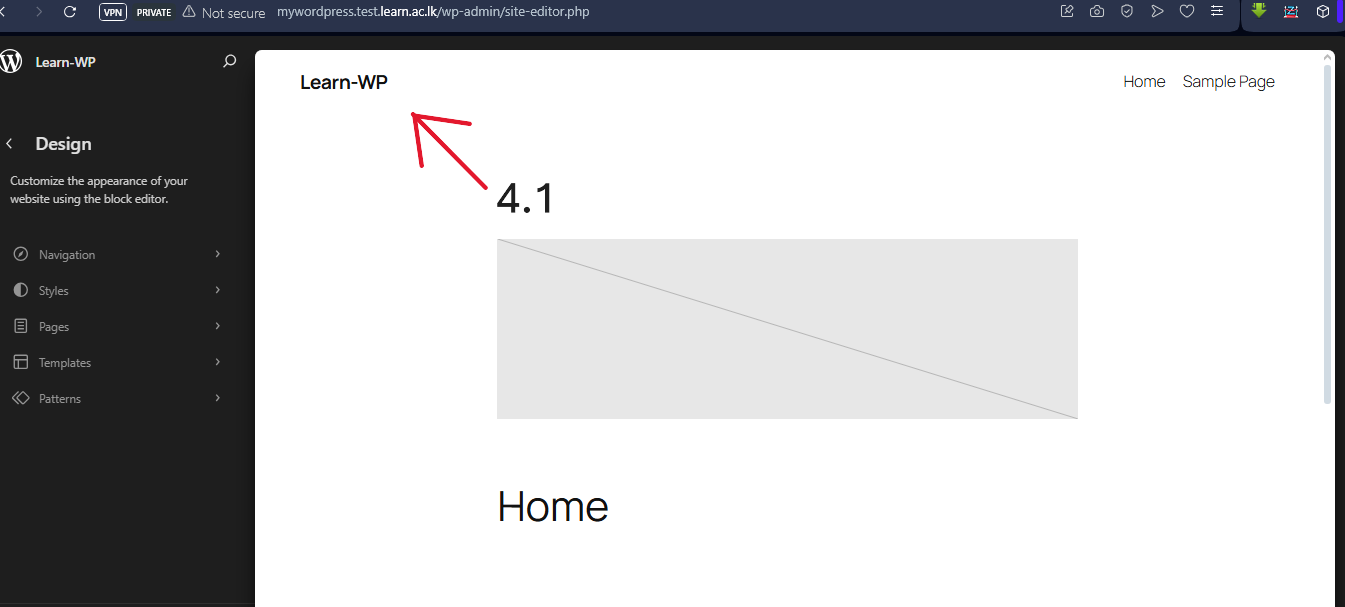
-
Once you come to the page, click on the Learn-WP
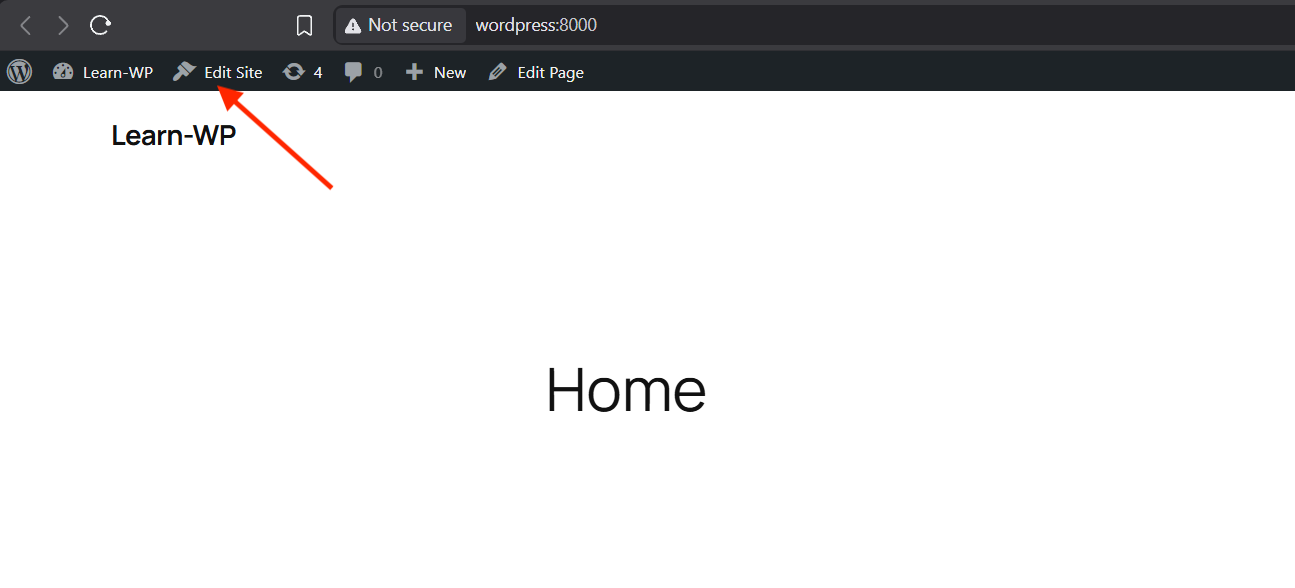
-
then click on the Edit Site link (top left)
- then click again on the Learn-WP to get the menu
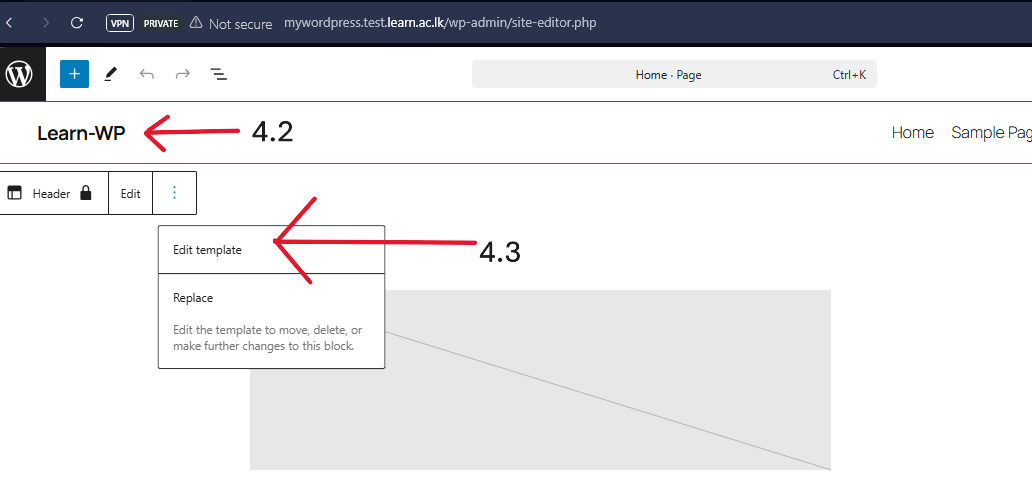
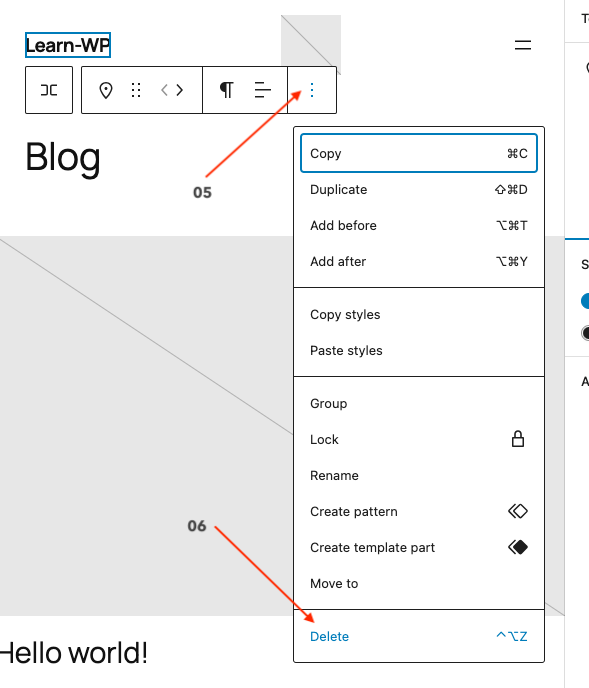
- Click on Site Identity (⋮) [5] → Delete it[6].
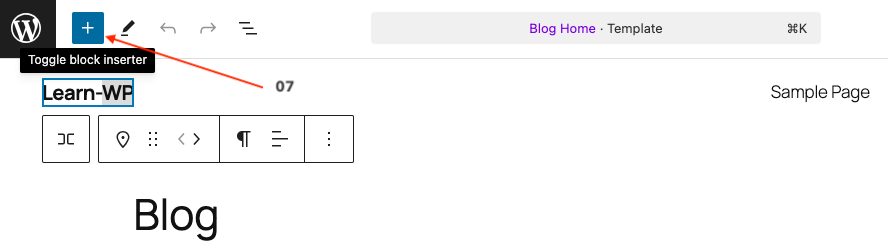
- Click on + ICON [7].
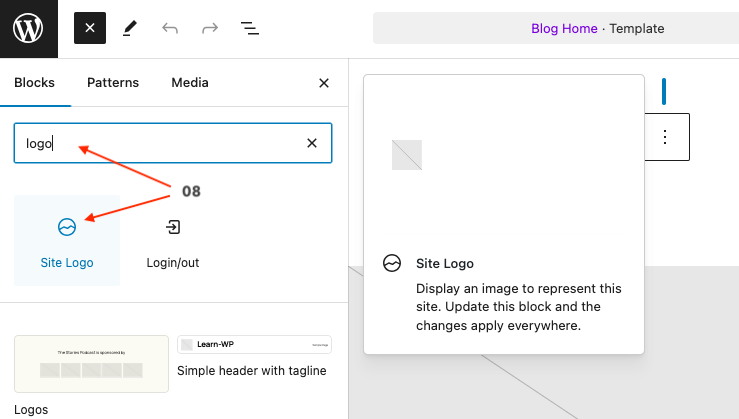
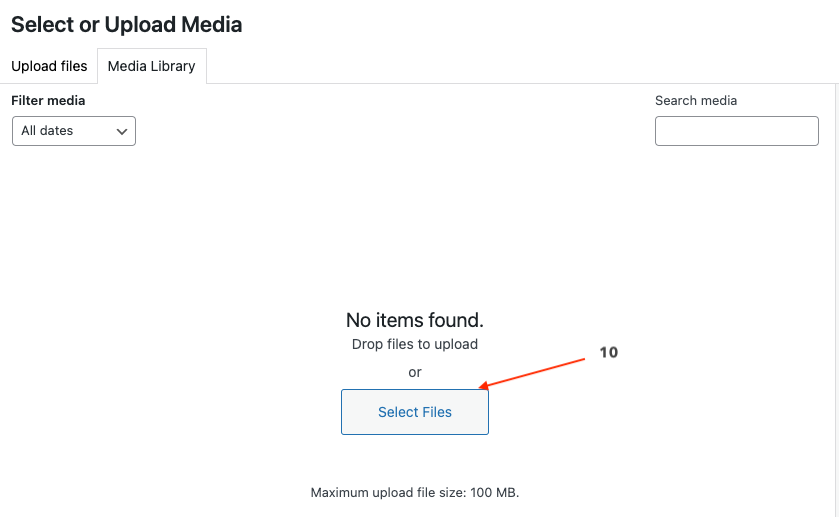
- Search and Insert The Logo [8]
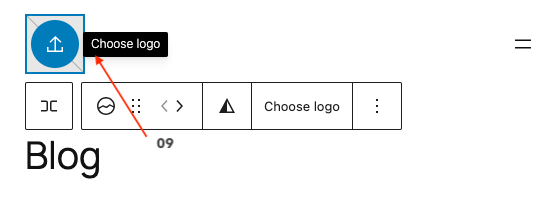
- Click on Choose the Logo[9]
- Upload your logo and click Publish.

- Then Logo > Click on Move left > Save

2. Menu Section
✅ Before creating the menu, first create the necessary pages (Service, Contact, About).
- Go to Dashboard [12] → Pages[13] → Add New[14].
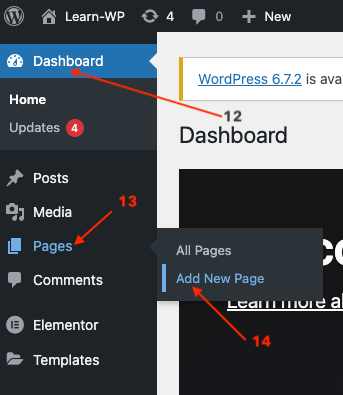
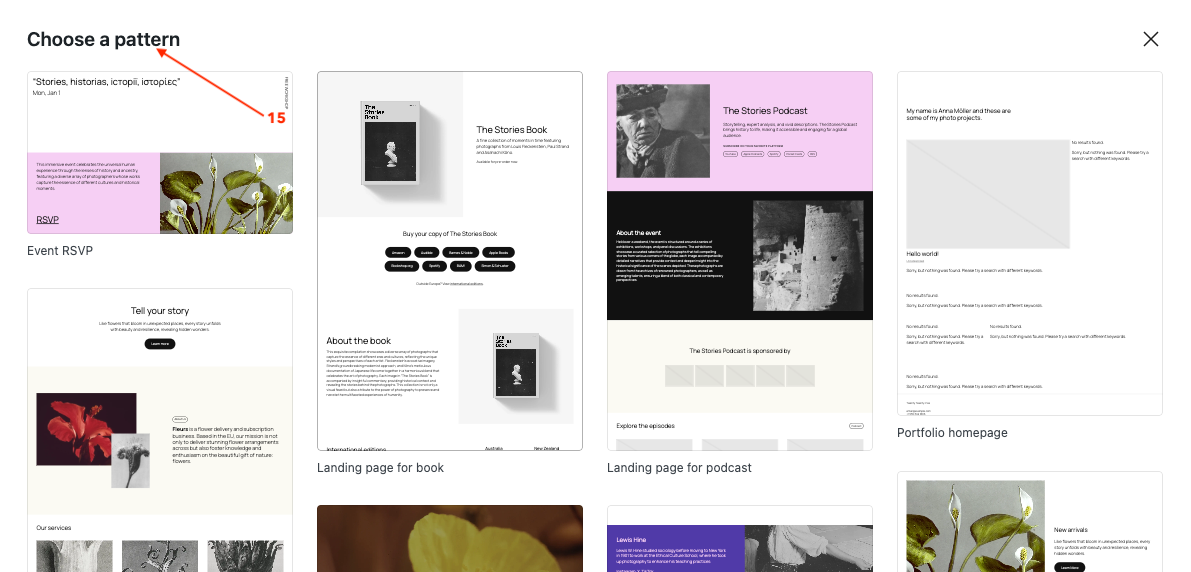
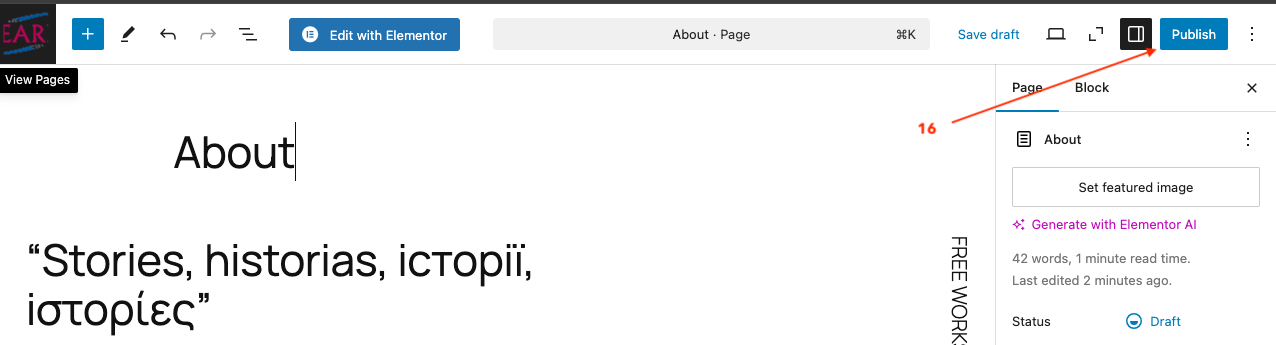
- Choose the design [15], then create and publish these pages [16]:
- Services
- Contact
- About
- The menu will be automatically added to the designed page [17]. If it is not applied, follow the steps below:
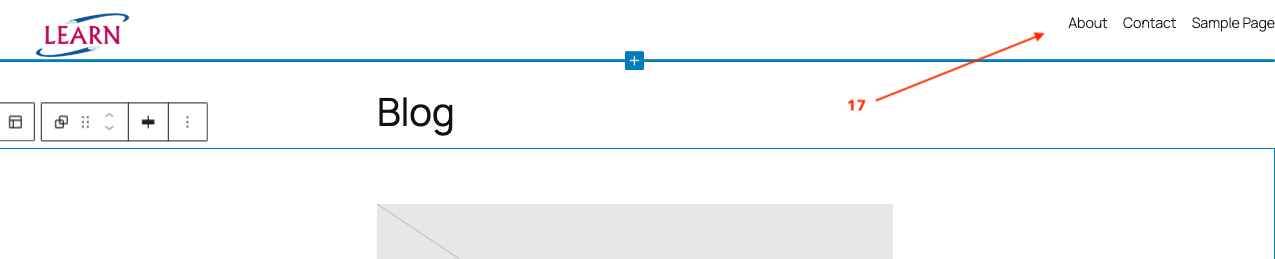
- Go to Appearance → Menus.
- Click Create a New Menu and name it Main Menu.
- Add the pages (Home, Service, Contact, About) to the menu.
- Select Primary Menu and click Save Menu.
3: Add the Slider to the Homepage
Using the Site Editor (Full Site Editing - FSE)
- Go to Dashboard → Appearance → Editor (Site Editor).
- Navigate to the Homepage template.
- Click + (Add Block) [18] and search for Shortcode or Smart Slider 3 Block [19].

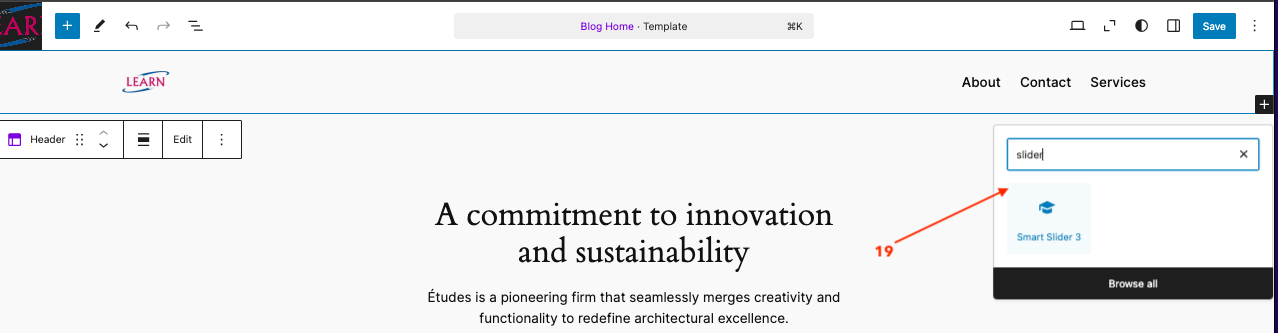
- Click on the Smart Slider block to add it to the page.
- Click on the slideshow edit settings [20].
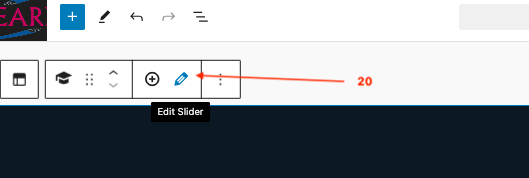
- Click Add New → Select a slider type.
- Upload your images and add text if needed.
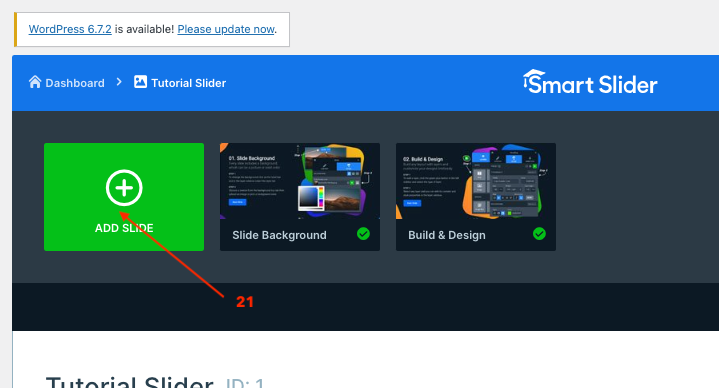
- Click Save once the slider is ready.
4 : Content Section (Two Columns: Text & Image)
- Go to Dashboard → Appearance → Editor (Site Editor).
- Navigate to the Homepage template.
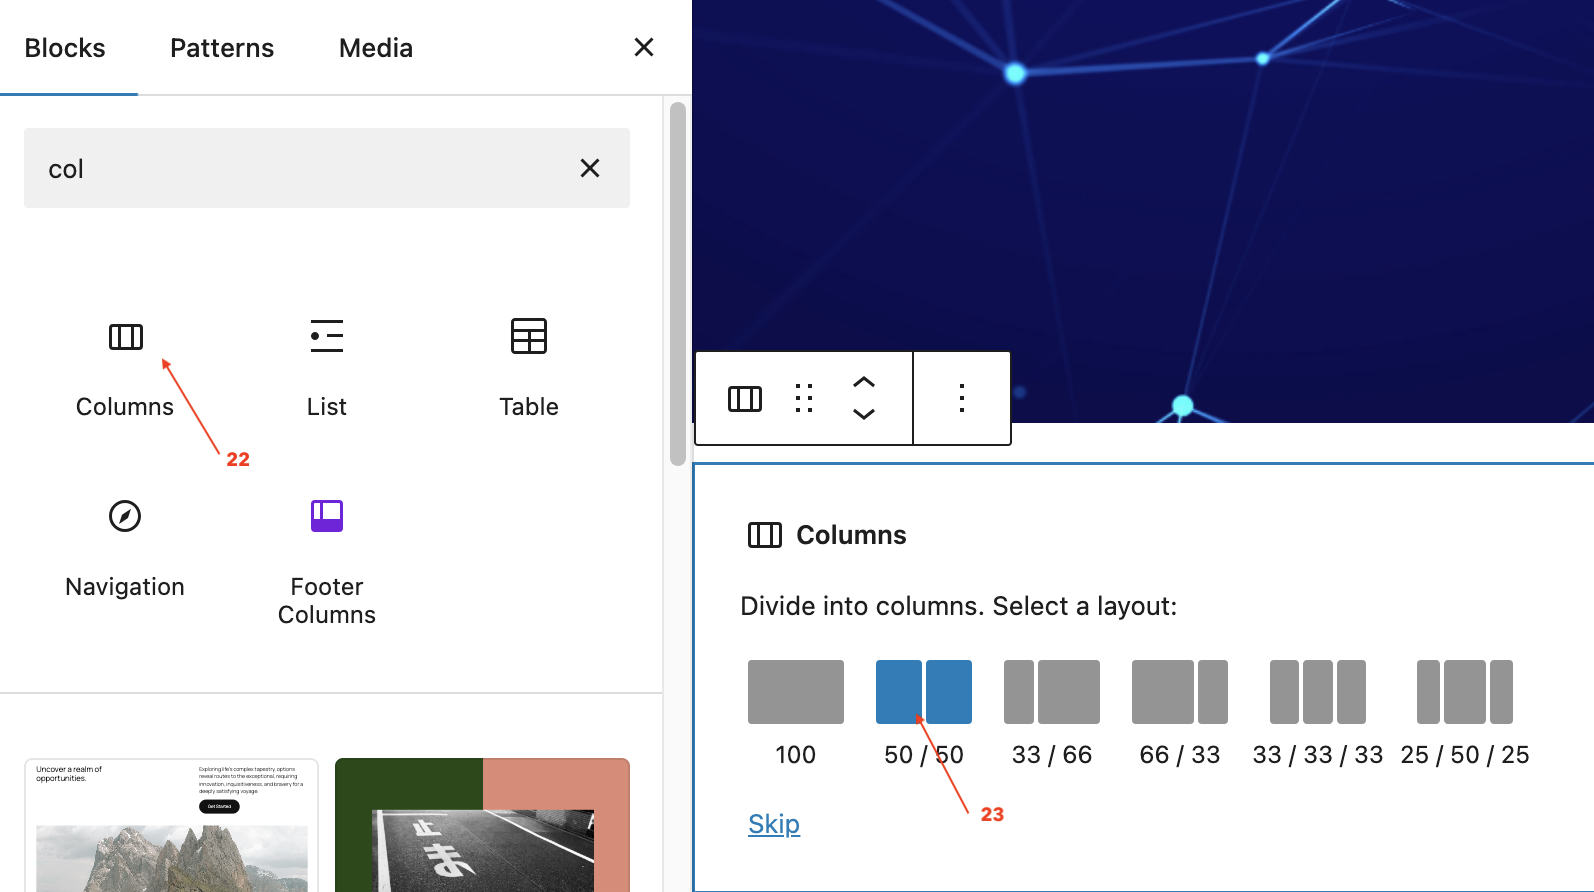
- Click + (Add Block) and add a Columns block[22] (select the two-column layout)[23].
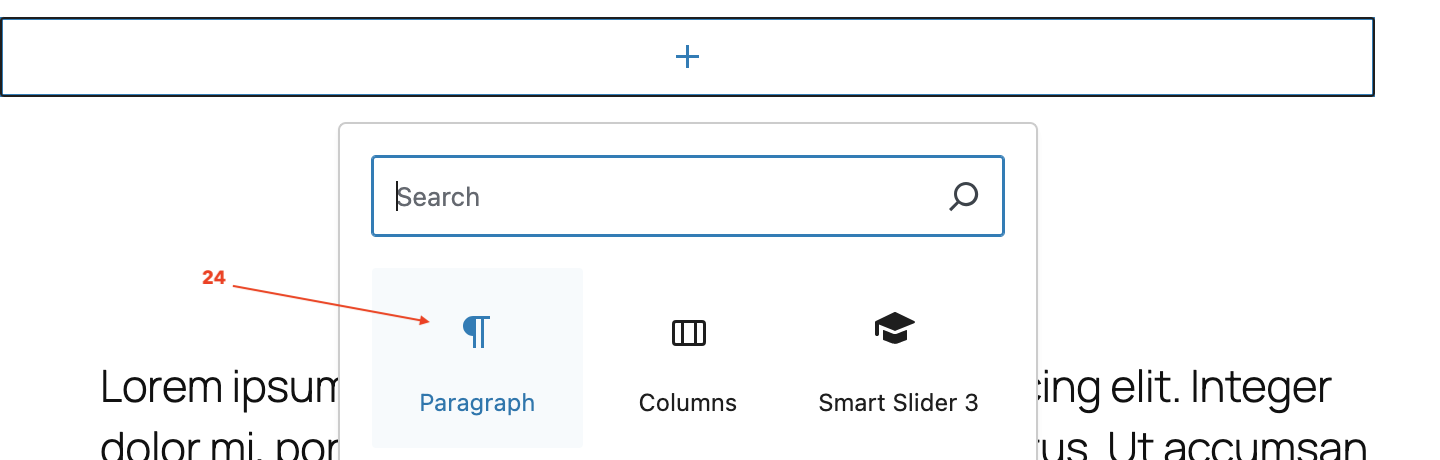
- In the first column, click + (Add Block) and select the Paragraph block [24] to add text content.
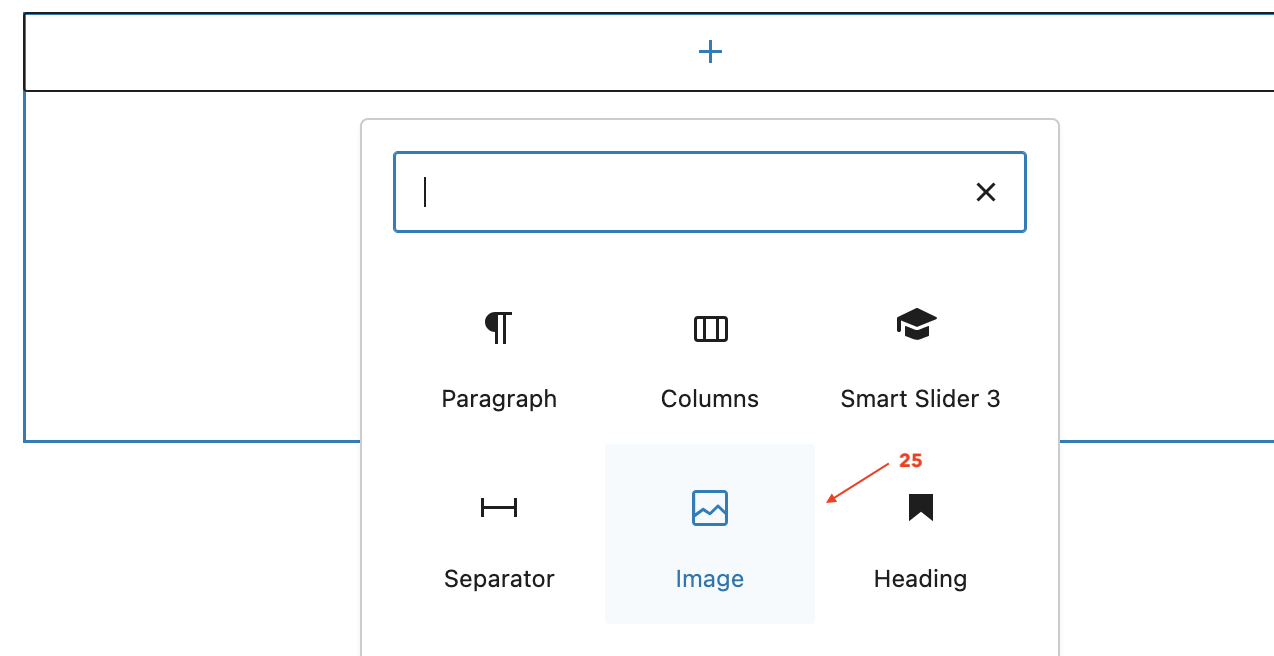
- In the second column, click + (Add Block) and select the Image block [25]to upload an image.
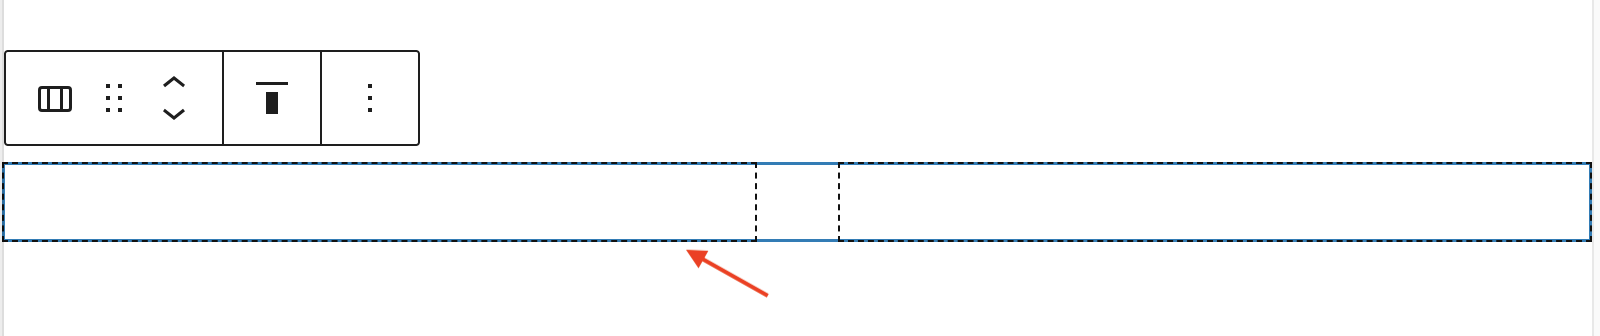
7.for full width coloumn follow the following steps

- Click Save to apply changes.
5. Our Services Section (Four Columns)
- In the Site Editor, go to the Homepage template.
- Click + (Add Block) and add a Columns block.
- Select a Column Layout
- WordPress shows default presets: Two columns, Three columns, etc.
- Choose Two columns (don’t worry—you’ll adjust it next).
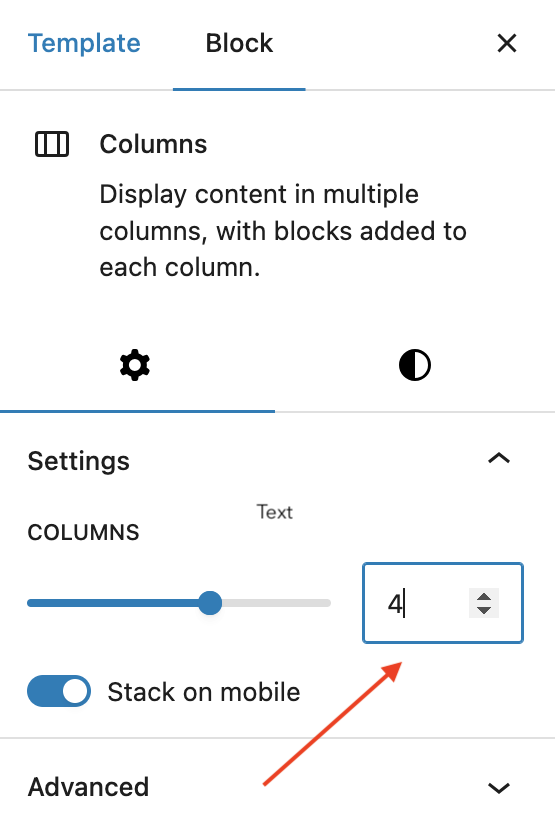
- Open Column Settings
- Click the Columns block (the parent block, not the individual column).
- Look at the right sidebar (Block settings).
- If you don’t see the sidebar, click the ⚙️ settings gear icon on the top-right.
- Adjust Number of Columns
- In the sidebar, you should see “Columns” or “Number of columns”.
- Use the arrows or type 4 to set it to 4 columns.
- Now, inside each column:
- Click + (Add Block) and insert an Image block (upload a service image).
- Below the image, click + (Add Block) and insert a Paragraph block (add a short description of the service).
- Repeat for all 4 columns.
- Click Save to apply changes.
6: Two-Column Section (Image & Text)
- In the Site Editor, navigate to the Homepage template.
- Click + (Add Block) and add a Columns block (select the two-column layout).
- In the first column, click + (Add Block) and select an Image block to upload an image.
- In the second column, click + (Add Block) and select a Paragraph block to add text.
- Click Save to apply changes.
7: Footer Section
- Go to Dashboard → Appearance → Editor (Site Editor) → Footer.
- Click + (Add Block) and insert relevant widgets:
- Paragraph block for copyright text.
- Social Icons block for social media links.
- Columns block to arrange contact info, address, and other footer details.
- Click Save to apply changes.
Now, your homepage is fully built using the Full Site Editor (FSE)!
8: Test & Launch
✅ Check mobile and tablet responsiveness using Customize → Mobile Preview.
✅ Optimize the site speed using WP Rocket or LiteSpeed Cache.
✅ Deploy the website by linking your domain name to your hosting provider.
"Now your WordPress website is fully built based on your wireframe! Here is the final output."